
Navigating the Network Landscape: A Comprehensive Guide to Nmap Commands
Related Articles: Navigating the Network Landscape: A Comprehensive Guide to Nmap Commands
Introduction
In this auspicious occasion, we are delighted to delve into the intriguing topic related to Navigating the Network Landscape: A Comprehensive Guide to Nmap Commands. Let’s weave interesting information and offer fresh perspectives to the readers.
Table of Content
Navigating the Network Landscape: A Comprehensive Guide to Nmap Commands
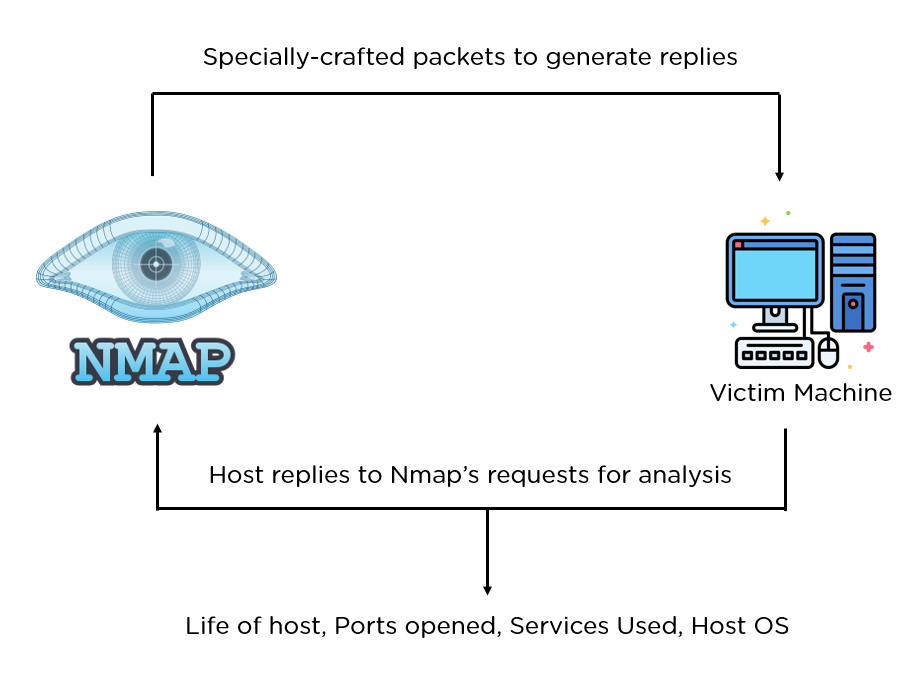
Nmap, short for Network Mapper, is a powerful and versatile tool for network exploration and security auditing. It allows users to scan networks, identify hosts, discover open ports, and gather information about services running on those ports. This information can be invaluable for network administrators, security professionals, and even curious individuals seeking to understand their network environment.
This comprehensive guide delves into the diverse world of Nmap commands, providing a detailed explanation of their functionalities and practical applications. We will explore various commands, their syntax, and how they can be utilized effectively to perform network scans, gather information, and even identify potential vulnerabilities.
Essential Nmap Commands: A Foundation for Exploration
The foundation of Nmap lies in its core commands, providing the basic functionalities for network discovery and information gathering. These commands serve as building blocks for more complex scans and analysis.
1. Nmap Scan Types:
-
-T (Timing Template): This option controls the speed of the scan, influencing the time it takes to complete. Different timing templates are available, ranging from aggressive scans that complete quickly but may be noisy to stealthy scans that are less intrusive but take longer.
-
Example:
nmap -T4 192.168.1.0/24(Performs a scan with a timing template of 4, which is aggressive and faster)
-
Example:
-
-sT (TCP Connect Scan): This is the default scan type. It attempts to establish a connection to each port on the target host. This scan is relatively straightforward and reliable but can be detected by firewalls.
-
Example:
nmap -sT 192.168.1.1(Performs a TCP connect scan on the IP address 192.168.1.1)
-
Example:
-
-sS (TCP SYN Scan): This scan sends a SYN packet to each port, mimicking an initial connection attempt. It does not establish a full connection, making it less intrusive and harder to detect. However, it requires more technical knowledge to interpret the results.
-
Example:
nmap -sS 192.168.1.0/24(Performs a TCP SYN scan on the subnet 192.168.1.0/24)
-
Example:
-
-sU (UDP Scan): This scan probes UDP ports for responses. UDP is a connectionless protocol, so Nmap sends a UDP packet to each port and waits for a response. This can be more challenging to interpret as not all UDP services respond to probes.
-
Example:
nmap -sU -p 53 192.168.1.1(Performs a UDP scan on port 53 (DNS) of the IP address 192.168.1.1)
-
Example:
-
-sN (Null Scan): This scan sends a null packet to each port. It is primarily used to identify hosts that are filtering packets based on their flags.
-
Example:
nmap -sN 192.168.1.0/24(Performs a null scan on the subnet 192.168.1.0/24)
-
Example:
-
-sF (FIN Scan): This scan sends a FIN packet to each port. It is similar to a null scan and can be used to identify hosts that are filtering packets based on their flags.
-
Example:
nmap -sF 192.168.1.1(Performs a FIN scan on the IP address 192.168.1.1)
-
Example:
-
-sX (Xmas Scan): This scan sends a packet with the FIN, PSH, and URG flags set. Like null and FIN scans, it is used to identify hosts that are filtering packets based on their flags.
-
Example:
nmap -sX 192.168.1.0/24(Performs a Xmas scan on the subnet 192.168.1.0/24)
-
Example:
2. Port Specification:
-
-p (Port Range): This option allows you to specify the ports you want to scan. You can use a single port number, a range of ports, or a comma-separated list of ports.
-
Example:
nmap -p 80,443 192.168.1.1(Scans ports 80 and 443 on the IP address 192.168.1.1)
-
Example:
-
-F (Fast Scan): This option scans a default set of common ports, providing a quick overview of open services.
-
Example:
nmap -F 192.168.1.0/24(Performs a fast scan on the subnet 192.168.1.0/24)
-
Example:
-
-T (Top Ports): This option scans the top 1000 or 100 most popular ports based on the Nmap port database.
-
Example:
nmap -T1000 192.168.1.1(Scans the top 1000 ports on the IP address 192.168.1.1)
-
Example:
3. Output and Formatting:
-
-oN (Normal Output): This option saves the scan results to a plain text file.
-
Example:
nmap -oN results.txt 192.168.1.1(Saves the scan results to the file "results.txt")
-
Example:
-
-oX (XML Output): This option saves the scan results in XML format, which can be easily parsed by other tools.
-
Example:
nmap -oX results.xml 192.168.1.1(Saves the scan results to the file "results.xml" in XML format)
-
Example:
-
-oG (Grepable Output): This option saves the scan results in a format that is easily searchable using tools like grep.
-
Example:
nmap -oG results.grep 192.168.1.1(Saves the scan results to the file "results.grep" in grepable format)
-
Example:
4. Host Discovery:
-
-Pn (Ping Scan): This option disables the default ping scan, allowing you to scan hosts that may be firewalled or otherwise configured to block ICMP requests.
-
Example:
nmap -Pn 192.168.1.0/24(Performs a scan without pinging the hosts)
-
Example:
-
-R (Reverse DNS Lookup): This option performs a reverse DNS lookup on each host, attempting to resolve the IP address to a hostname.
-
Example:
nmap -R 192.168.1.0/24(Performs a reverse DNS lookup on all hosts in the subnet)
-
Example:
5. Scripting and Advanced Features:
-
-sC (Default Scripts): This option runs a set of default Nmap scripts, which can provide additional information about the target hosts and services.
-
Example:
nmap -sC 192.168.1.1(Runs the default Nmap scripts on the IP address 192.168.1.1)
-
Example:
-
-sV (Version Detection): This option attempts to identify the version of the services running on open ports.
-
Example:
nmap -sV 192.168.1.1(Attempts to identify the versions of services running on the IP address 192.168.1.1)
-
Example:
-
–script (Specific Scripts): This option allows you to run specific Nmap scripts.
-
Example:
nmap --script http-title 192.168.1.1(Runs the "http-title" script to retrieve the title of the web server)
-
Example:
Unveiling the Power of Nmap Commands: Practical Applications
The true value of Nmap lies in its ability to provide a comprehensive understanding of network infrastructure and potential vulnerabilities. Here are some real-world examples of how Nmap commands can be utilized:
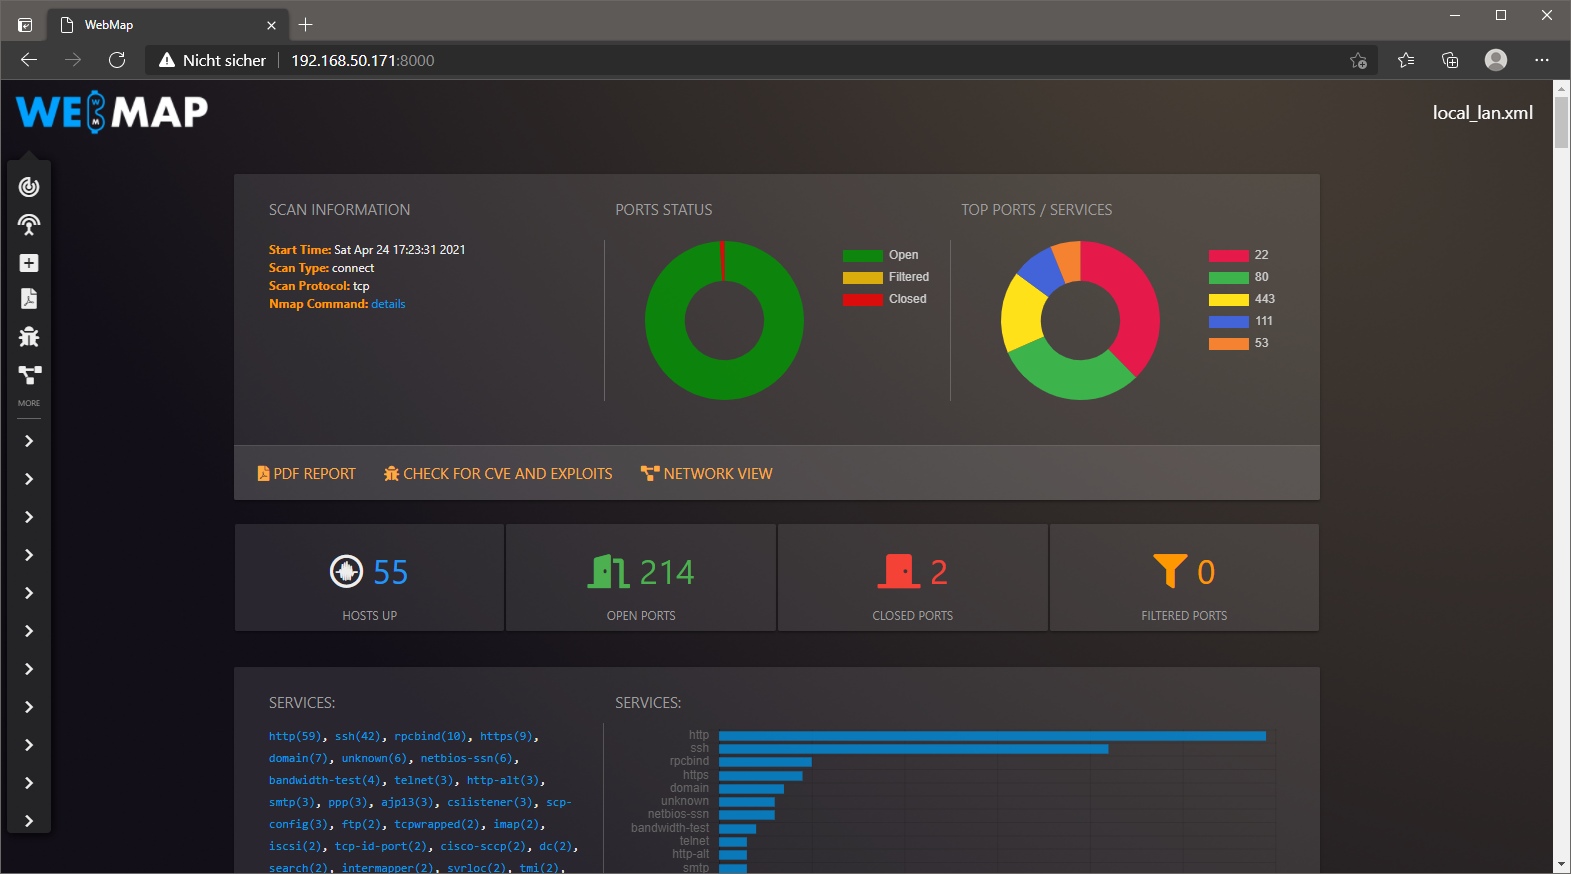
- Network Discovery and Mapping: Nmap can be used to scan a network and identify all active hosts, their IP addresses, and their open ports. This information is crucial for network administrators to understand the layout of their network and identify potential security risks.
- Service Enumeration: Nmap can identify the services running on each host and the versions of those services. This information is essential for security professionals to understand the potential vulnerabilities of the network and plan mitigation strategies.
- Vulnerability Scanning: Nmap can be used to identify known vulnerabilities in network devices and services. This information can help security professionals prioritize remediation efforts and protect the network from attacks.
- Network Security Audits: Nmap can be used to perform comprehensive network security audits, identifying potential security risks and vulnerabilities. This information can be used to improve the overall security posture of the network.
- Troubleshooting Network Connectivity Issues: Nmap can help troubleshoot network connectivity issues by identifying the points of failure and providing insights into the underlying problems.
Beyond the Basics: Exploring Nmap’s Advanced Capabilities
Nmap offers a wealth of advanced functionalities beyond the basic commands, allowing for more targeted and in-depth analysis. These capabilities empower users to conduct sophisticated scans and gather detailed information about network infrastructure.
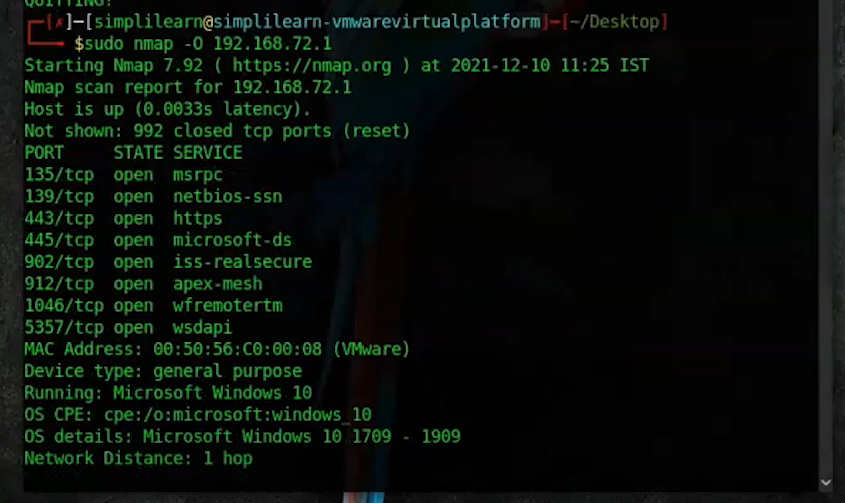
1. Operating System Detection:
-
-O (Operating System Detection): This option attempts to identify the operating system running on each host. It analyzes the responses from the target host and compares them to a database of known operating system fingerprints.
-
Example:
nmap -O 192.168.1.1(Attempts to identify the operating system running on the IP address 192.168.1.1)
-
Example:
2. Service and Application Fingerprinting:
-
-sV (Version Detection): As mentioned earlier, this option attempts to identify the version of the services running on open ports. It goes beyond simply detecting the port number to provide more detailed information about the specific service and its version.
-
Example:
nmap -sV 192.168.1.1(Attempts to identify the versions of services running on the IP address 192.168.1.1)
-
Example:
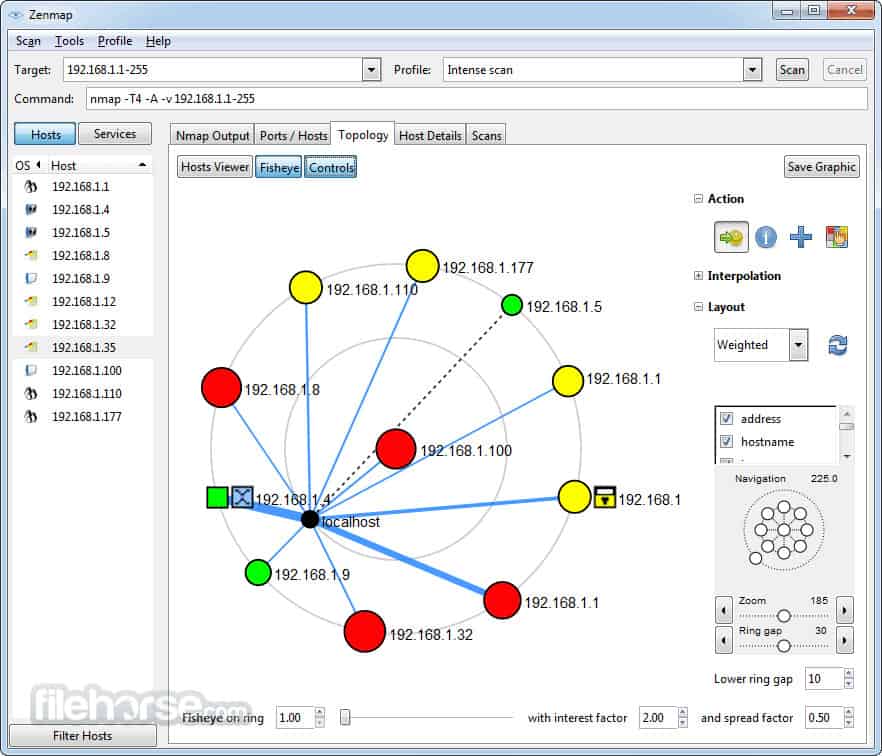
3. Network Mapping and Visualization:
-
-T4 (Aggressive Timing Template): This option allows for faster scans, enabling rapid network mapping and exploration.
-
Example:
nmap -T4 192.168.1.0/24(Performs a scan with an aggressive timing template, enabling faster network mapping)
-
Example:
-
-n (No DNS Resolution): This option disables DNS resolution, allowing for faster scans, especially when scanning large networks.
-
Example:
nmap -n 192.168.1.0/24(Performs a scan without DNS resolution, improving scan speed)
-
Example:
4. Scripting and Customization:
-
–script (Specific Scripts): As mentioned earlier, this option allows you to run specific Nmap scripts. These scripts can perform various tasks, such as identifying vulnerabilities, gathering additional information about services, or even automating tasks.
-
Example:
nmap --script http-enum 192.168.1.1(Runs the "http-enum" script to enumerate the web server’s directory structure)
-
Example:
-
-iL (Input File): This option allows you to read a list of target hosts from a file. This is useful when you need to scan a large number of hosts or when you want to scan a list of hosts that you have gathered from other sources.
-
Example:
nmap -iL targets.txt(Reads the list of target hosts from the file "targets.txt")
-
Example:
5. Security Auditing and Vulnerability Detection:
-
-sC (Default Scripts): This option runs a set of default Nmap scripts, which can identify known vulnerabilities and provide insights into potential security risks.
-
Example:
nmap -sC 192.168.1.1(Runs the default Nmap scripts on the IP address 192.168.1.1)
-
Example:
-
–script (Specific Scripts): This option allows you to run specific Nmap scripts designed for vulnerability detection.
-
Example:
nmap --script vuln-cve-2022-30190 192.168.1.1(Runs the "vuln-cve-2022-30190" script to check for a specific vulnerability)
-
Example:
Navigating the Nmap Command Landscape: FAQs
1. What is the difference between a TCP SYN Scan and a TCP Connect Scan?
A TCP SYN Scan (using the -sS option) sends a SYN packet to each port, mimicking an initial connection attempt without establishing a full connection. This makes it less intrusive and harder to detect by firewalls. A TCP Connect Scan (using the -sT option) establishes a full connection to each port, making it more reliable but also more likely to be detected.
2. How can I scan a specific range of ports?
You can use the -p option to specify the ports you want to scan. For example, nmap -p 80,443 192.168.1.1 will scan ports 80 and 443 on the IP address 192.168.1.1.
3. How can I save the scan results to a file?
You can use the -oN option to save the scan results to a plain text file, -oX to save them in XML format, or -oG to save them in a grepable format.
4. What is the purpose of the -sV option?
The -sV option attempts to identify the version of the services running on open ports. This can be helpful for security auditing and vulnerability assessment.
5. How can I use Nmap to identify the operating system of a host?
You can use the -O option to attempt to identify the operating system running on each host. Nmap analyzes the responses from the target host and compares them to a database of known operating system fingerprints.
6. What are Nmap scripts, and how can I use them?
Nmap scripts are small programs that can be used to perform various tasks, such as identifying vulnerabilities, gathering additional information about services, or even automating tasks. You can run specific scripts using the --script option.
7. How can I scan a network without pinging the hosts?
You can use the -Pn option to disable the default ping scan. This allows you to scan hosts that may be firewalled or otherwise configured to block ICMP requests.
8. How can I scan a large number of hosts from a file?
You can use the -iL option to read a list of target hosts from a file. This is useful when you need to scan a large number of hosts or when you want to scan a list of hosts that you have gathered from other sources.
9. What are the different timing templates in Nmap?
Nmap offers various timing templates (using the -T option) to control the speed of the scan. These templates range from aggressive scans that complete quickly but may be noisy to stealthy scans that are less intrusive but take longer.
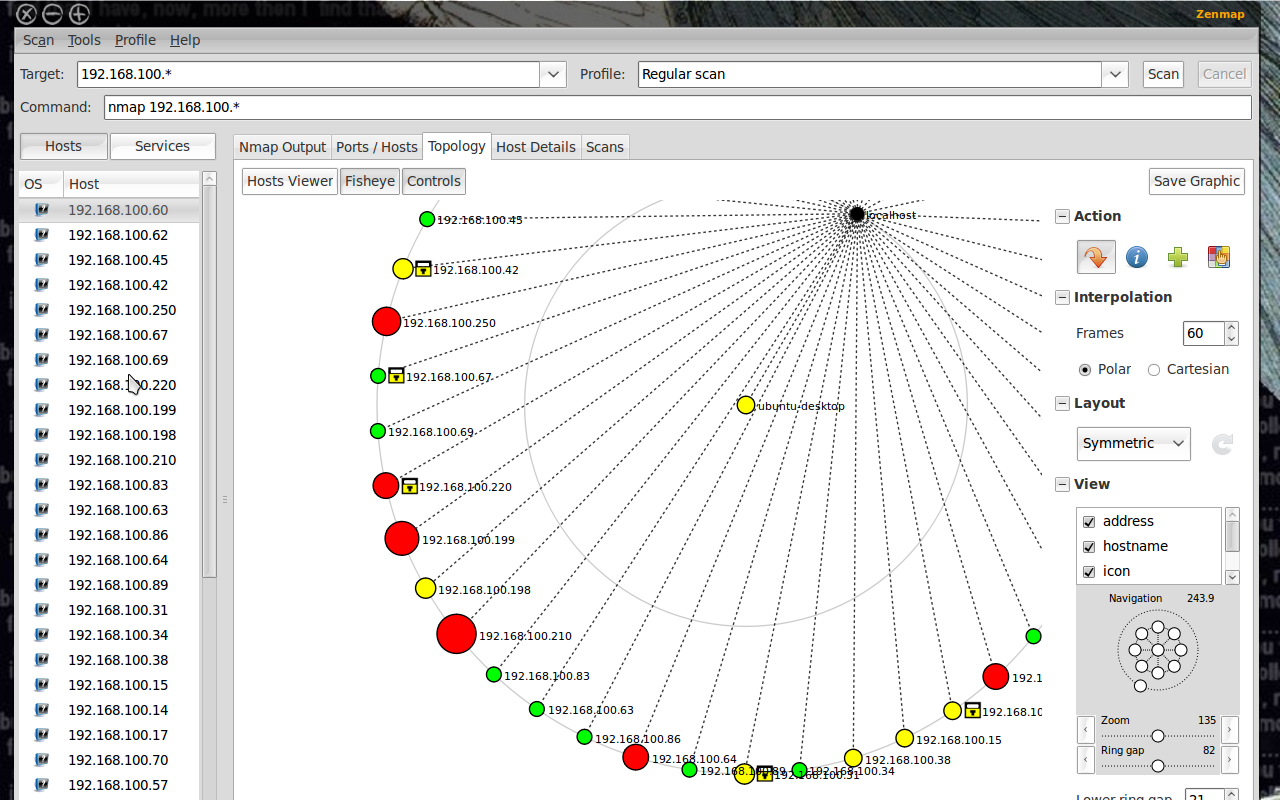
10. How can I use Nmap to visualize the network topology?
Nmap can be used to map the network topology by identifying the hosts and their connections. You can then use tools like Graphviz or other visualization software to create a graphical representation of the network.
Tips for Effective Nmap Usage
- Start with basic scans: Begin with simple scans to understand the network environment and identify potential targets before venturing into more complex and potentially intrusive scans.
- Use timing templates judiciously: Choose appropriate timing templates based on the purpose of the scan and the sensitivity of the network. Aggressive scans may be suitable for initial exploration, while stealthy scans are preferred for security audits.
- Utilize Nmap scripts: Leverage Nmap scripts to automate tasks, gather additional information about services, and identify potential vulnerabilities.
- Understand the limitations of Nmap: Be aware of the limitations of Nmap, such as its inability to scan encrypted traffic or identify vulnerabilities that require specific exploit code.
- Practice ethical hacking principles: Always obtain permission before scanning networks or performing any actions that could potentially disrupt or compromise network security.
- Stay updated on Nmap features: Nmap is constantly evolving, with new features and scripts being added regularly. Stay informed about the latest developments to make the most of this powerful tool.
Conclusion: Unlocking Network Insights with Nmap
Nmap is an indispensable tool for network professionals, security researchers, and anyone seeking to understand and analyze network infrastructure. Its comprehensive command set provides a wide range of functionalities, from basic network discovery to advanced vulnerability scanning and operating system detection. By mastering the art of Nmap commands, users can gain valuable insights into their network environment, identify potential security risks, and enhance the overall security posture of their systems.
Remember to utilize Nmap responsibly and ethically, respecting the privacy and security of others. As you delve deeper into the world of Nmap, you will discover its immense potential for network exploration, security auditing, and troubleshooting.


Closure
Thus, we hope this article has provided valuable insights into Navigating the Network Landscape: A Comprehensive Guide to Nmap Commands. We thank you for taking the time to read this article. See you in our next article!