
Illuminating Beauty: A Comprehensive Guide to Highlighter Placement
Related Articles: Illuminating Beauty: A Comprehensive Guide to Highlighter Placement
Introduction
With enthusiasm, let’s navigate through the intriguing topic related to Illuminating Beauty: A Comprehensive Guide to Highlighter Placement. Let’s weave interesting information and offer fresh perspectives to the readers.
Table of Content
Illuminating Beauty: A Comprehensive Guide to Highlighter Placement

Highlighter, a staple in many makeup routines, has the power to transform a look from ordinary to extraordinary. Its ability to accentuate and illuminate key facial features can create a radiant and youthful glow, enhancing natural beauty. However, mastering the art of highlighter placement is key to achieving a flawless and flattering finish. This comprehensive guide delves into the intricacies of highlighter application, providing a detailed understanding of its benefits and optimal placement techniques.
The Magic of Highlighter: A Multifaceted Tool
Highlighter, in its essence, is a light-reflecting product designed to mimic the way natural light falls on the face. It serves several key purposes, including:
- Illumination: Highlighter brightens and illuminates the skin, diminishing the appearance of shadows and imperfections.
- Definition: It accentuates facial features, highlighting cheekbones, brow bones, and the cupid’s bow, creating a sculpted and defined look.
- Dimension: Highlighter adds depth and dimension to the face, enhancing natural contours and creating a more balanced appearance.
- Freshness: It imparts a youthful and radiant glow, minimizing the appearance of fatigue and dullness.
Understanding the Different Types of Highlighter
Highlighter comes in a variety of forms, each with its own unique texture and application properties:
- Powder Highlighter: This is the most common type, offering a subtle and buildable finish. Powder highlighters are generally easy to blend and suitable for all skin types.
- Cream Highlighter: Cream highlighters provide a more intense and dewy finish, ideal for creating a natural, lit-from-within glow. They are best suited for dry or normal skin types.
- Liquid Highlighter: Liquid highlighters offer a versatile application, blending seamlessly into the skin for a radiant and natural finish. They are suitable for all skin types and can be used as a subtle everyday glow or a more dramatic highlight.
- Stick Highlighter: Stick highlighters are convenient and easy to use, offering precise application and a buildable finish. They are suitable for all skin types and can be used for both subtle and intense highlighting.
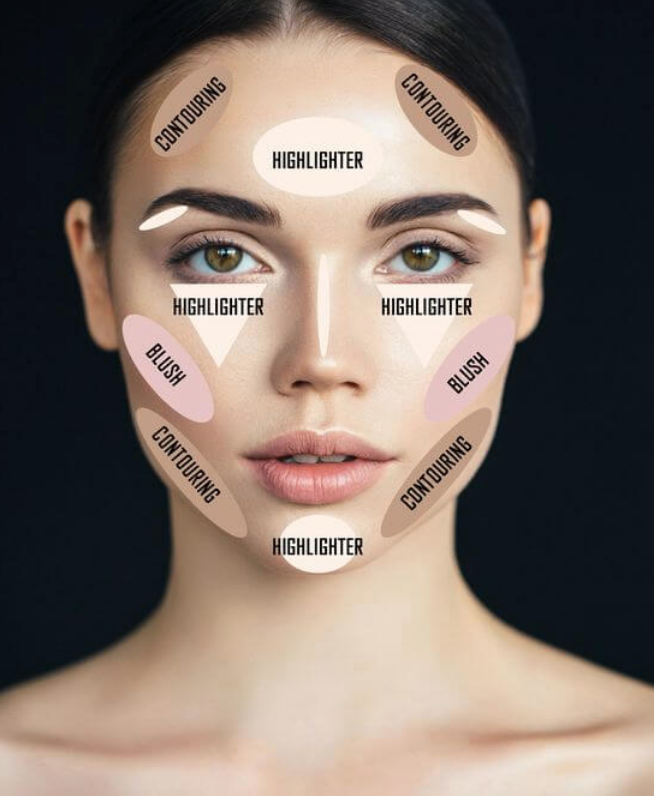
Mastering the Art of Highlighter Placement: A Step-by-Step Guide
The key to flawless highlighter application lies in understanding its strategic placement. Here’s a step-by-step guide to achieve a naturally radiant and sculpted look:
- Prep the Skin: Before applying highlighter, ensure the skin is properly prepped and moisturized. This allows the highlighter to glide smoothly and blend seamlessly.
- Foundation and Concealer: Apply foundation and concealer as usual, ensuring an even base for the highlighter to adhere to.
- Cheekbones: Sweep highlighter along the tops of the cheekbones, starting from the outer corner of the eye and blending towards the temples. This creates a natural lift and definition.
- Brow Bone: Apply highlighter to the brow bone, just below the arch, to create a subtle lift and brighten the eyes.
- Cupid’s Bow: Highlight the center of the upper lip, just above the cupid’s bow, to add fullness and definition.
- Inner Corners of the Eyes: Apply a touch of highlighter to the inner corners of the eyes to brighten and open up the eyes.
- Bridge of the Nose: A thin line of highlighter down the bridge of the nose creates a subtle contour and adds a touch of dimension.
- Chin: A small amount of highlighter on the center of the chin can balance out the face and create a more defined jawline.
- Blend, Blend, Blend: After applying highlighter, blend it thoroughly with a brush or sponge to achieve a seamless and natural finish.
Tips for Flawless Highlighter Application:
- Choose the Right Shade: Select a highlighter shade that complements your skin tone. For fair skin, opt for champagne or pearl tones. Medium skin tones can wear golden or peach hues, while darker skin tones can embrace bronze or copper shades.
- Start with a Light Hand: Apply highlighter in small amounts and gradually build up the intensity as needed.
- Blend Thoroughly: Blending is essential for a seamless and natural finish. Use a soft brush or sponge to blend the highlighter into the skin.
- Consider Your Skin Type: Choose a highlighter formula that suits your skin type. Powder highlighters are ideal for oily skin, while cream or liquid formulas are better suited for dry or normal skin.
- Experiment with Different Techniques: Don’t be afraid to experiment with different highlighter placement techniques to find what works best for you.
FAQs: Addressing Common Highlighter Concerns
Q: Can I use highlighter on all skin types?
A: Yes, highlighter can be used on all skin types. However, it’s important to choose the right formula for your specific skin type. Powder highlighters are generally suitable for oily skin, while cream or liquid formulas are better suited for dry or normal skin.
Q: Can I use highlighter daily?
A: Yes, highlighter can be used daily. A subtle application can enhance your natural glow and create a fresh, radiant look. However, for special occasions or a more dramatic effect, you can build up the intensity of the highlighter.
Q: How do I choose the right highlighter shade?
A: Select a highlighter shade that complements your skin tone. For fair skin, opt for champagne or pearl tones. Medium skin tones can wear golden or peach hues, while darker skin tones can embrace bronze or copper shades.
Q: What if I have acne-prone skin?
A: If you have acne-prone skin, choose a highlighter formula that is oil-free and non-comedogenic (won’t clog pores). Avoid applying highlighter directly on active breakouts.
Q: How do I make my highlighter last longer?
A: To make your highlighter last longer, apply a setting spray or powder over the top. This will help to lock in the pigment and prevent it from fading.
Conclusion: Illuminating Your Natural Beauty
Highlighter is a versatile and transformative makeup tool that can enhance your natural beauty and create a radiant, sculpted look. By understanding the different types of highlighter, mastering the art of placement, and following the tips and tricks provided, you can achieve a flawless and flattering finish. Embrace the power of highlighter and illuminate your inner glow!


Closure
Thus, we hope this article has provided valuable insights into Illuminating Beauty: A Comprehensive Guide to Highlighter Placement. We thank you for taking the time to read this article. See you in our next article!